Hero Info
"Float like feather, strike like steel."
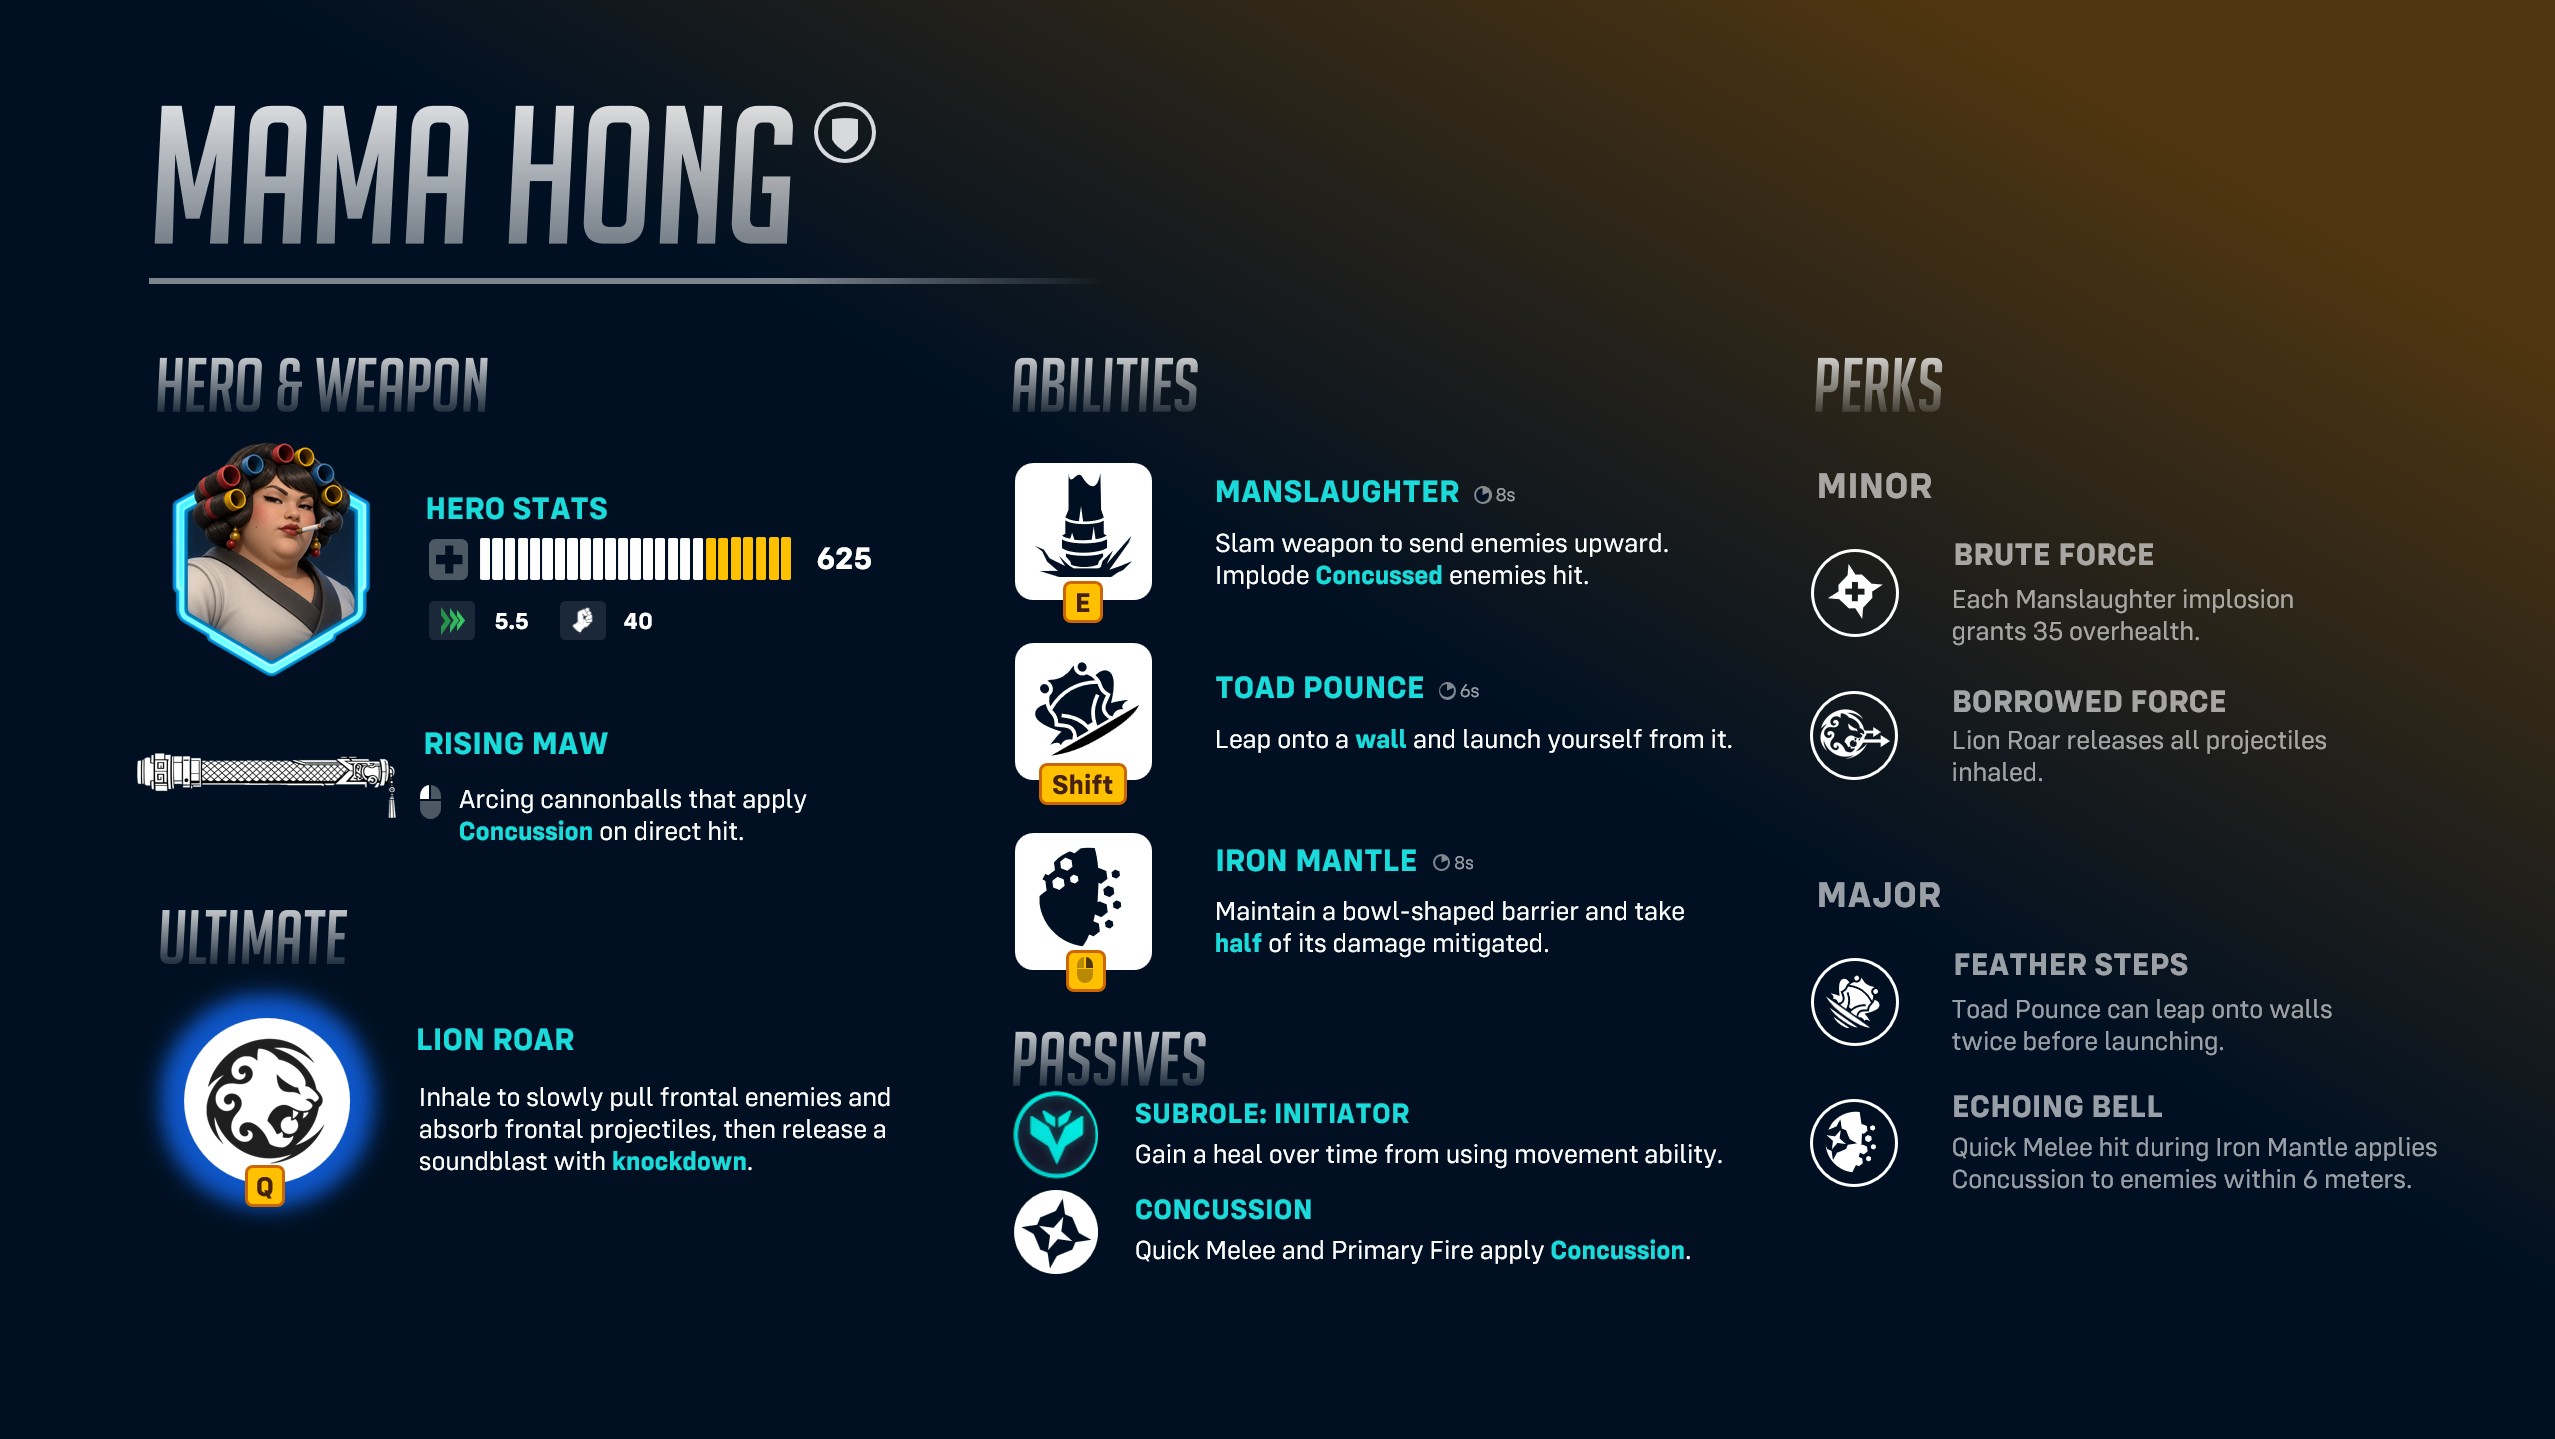
A reputable landlord and a legendary WuXing metalbender, Mama Hong came out of retirement to protect her land against Talon-affiliated forces.
Subrole: Initiator

Gain a heal over time from using movement ability.
Gain a heal over time from using movement ability.
Concussion

Quick Melee and Primary Fire apply Concussion, making enemies vulnerable to Manslaughter.
Duration: 4s
Quick Melee and Primary Fire apply Concussion, making enemies vulnerable to Manslaughter.
Rising Maw
 ️
️
Arcing cannonballs that apply Concussion on direct hit.
Cast Time: 0.3s
Damage: 40 (Impact) + 10~50 (splash)
Splash radius:2.5m
Rate of fire:1 round per 0.9s
Projectile speed:50m/s
Projectile radius:0.325m
Ammo:5
Reload time:1.5 seconds
Arcing cannonballs that apply Concussion on direct hit.
Manslaughter

Slam weapon to send enemies upward. Implode Concussed enemies hit.
Cast time:0.5s
Impact radius: 12m
Implosion Delay:0.6s
Damage:5~25 (shockwave) + 100 (implosion)
Launch height:3m
Slam weapon to send enemies upward. Implode Concussed enemies hit.
Toad Pounce

Leap onto a wall and launch yourself from it.
Damage:
25
Leap range:12m (arc)
Max duration on wall:2s
Launch range:2026m (arc)
Leap onto a wall and launch yourself from it.
Iron Mantle
 ️
️

Maintain a bowl-shaped barrier and take half of its damage mitigated.
Barrier dimension:2.25m radius hemisphere
Barrier health: 450
Barrier duration: 0.4s ~ 3s
Move speed penalty: -40%
Maintain a bowl-shaped barrier and take half of its damage mitigated.
Lion Roar

Inhale to slowly pull frontal enemies and absorb frontal projectiles, then release a soundblast with knockdown.
Rrange: 16m, 55° cone (Pull, Absorb, Soundblast)
Duration: 2s~4s
Pull speed: 2m/s (first 0.5s)
8m/s (after 0.5s)
Soundblast damage: 125
Soundblast Knockdown duration: 2s
Inhale to slowly pull frontal enemies and absorb frontal projectiles, then release a soundblast with knockdown.
8m/s (after 0.5s)
Brute Force

Imploding an enemy grants 35 overhealth.
Imploding an enemy grants 35 overhealth.
Borrowed Force

Lion Roar releases all projectiles inhaled.
Lion Roar releases all projectiles inhaled.
Feather Steps

Toad Pounce can leap for a third time if the second leap lands on a wall too.
Toad Pounce can leap for a third time if the second leap lands on a wall too.
Echoing Bell

Quick Melee hit during Iron Mantle applies Concussion to enemies within 6 meters.
Quick Melee hit during Iron Mantle applies Concussion to enemies within 6 meters.


Rising Maw (Old)
🖱Cannon that ignites on direct hit.
🖱Flamethrower burst. Switch weapon.
🖱Cannon that ignites on direct hit.
🖱Flamethrower burst. Switch weapon.
Bearfall Wok
![🍳]()
🖱Melee combo that detonates ignition.
🖱Throw weapon to knock enemies back. Switch weapon.
🖱Melee combo that detonates ignition.
🖱Throw weapon to knock enemies back. Switch weapon.
Rising Maw
️
Arcing cannonballs that apply Concussion on direct hit.
Arcing cannonballs that apply Concussion on direct hit.
Lion Roar (Old)
![🗣]()
Inhale frontal projectiles. Enough damage inhaled enables a linear, slowing roar.
Inhale frontal projectiles. Enough damage inhaled enables a linear, slowing roar.
Lion Roar
Inhale to slowly pull frontal enemies and absorb frontal projectiles, then release a soundblast with knockdown.
Inhale to slowly pull frontal enemies and absorb frontal projectiles, then release a soundblast with knockdown.
Manslaughter (Old)
![🔥]()
Transform recent damage taken into overhealth. Rising Maw becomes a blazing flamethrower.
Transform recent damage taken into overhealth. Rising Maw becomes a blazing flamethrower.
Manslaughter
️
Slam weapon to send enemies upward. Implode Concussed enemies hit.
Slam weapon to send enemies upward. Implode Concussed enemies hit.
Toad Pounce (Old)
Pounce towards the ground indicator when airborne. (Rocket jump makes you airborne too.)
Pounce towards the ground indicator when airborne. (Rocket jump makes you airborne too.)
Toad Pounce
Leap onto a wall and launch yourself from it.
Leap onto a wall and launch yourself from it.
Golden Bell

Wield a bell-shaped barrier, echoing Concussion buildup.
Wield a bell-shaped barrier, echoing Concussion buildup.
Iron Mantle
Maintain a bowl-shaped barrier and take half of its damage mitigated.
Maintain a bowl-shaped barrier and take half of its damage mitigated.
Iron Phallanx

Iron Mantle is 30% larger and inflicts 50% less damage, but no longer turns with you.
Iron Mantle is 30% larger and inflicts 50% less damage, but no longer turns with you.